< back to the Sound Card Digital Modes pageDigital Sound Card Mixer SettingsIn all sound card digital modes, your sound card's mixer settings are critical. In some digital mode programs, you may find controls within the program to adjust those settings; if not, use the Windows' Volume Control program. This program lets you adjust both the audio levels and the source (jack) of the audio (for example, LINE IN vs MIC and LINE OUT vs SPEAKERS). 1. Using Windows' Volume Control Program to Adjust Sound Card Settings To start, look for the volume control icon in the system tray on the lower right of your screen.  (If you don't see it displayed and want it to display permanently , see topic #4 below.) (If you don't see it displayed and want it to display permanently , see topic #4 below.) a. Transmit Audio SettingsLeft click twice very quickly on the Volume Control icon (or go to the Control Panel: Sounds: Audio). The Volume Control window should open . It initially displays settings for just the Playback (or TX) audio -- audio to the radio. Here is what that window looks like in my system; it may be somewhat different in your system because of the sound card type: 
The settings of importance on this window are: The left most Volume Control volume slider and the Wave volume slider work together. Consider "Wave" to mean the "Program" that is creating the outgoing digital signal. The Volume Control slider is a master control that will further adjust the Wave volume. Your ideal setting will depend largely on how well the attenuation circuit in your TX audio cable matches the optimal microphone input level of your radio. It's essential that neither of these two sliders be at the absolute bottom or near the bottom (this may mute the audio) , and it's essential that the Mute boxes are not checked. Leave all Balance sliders in the middle. They are for stereo channel control and setting the slider to the wrong side could mute outgoing sounds to the radio. I do mute all other possible audio sources ( Mic, Line In, and CD), so that only the program (wave) outputs sound to the radio and not other sources. If others tell you that your deviation or audio is too low, you can increase it by raising the "Wave" or / and "Master" Playback sliders. If you are told your deviation or audio is too high or that you are over deviating, decrease the "Wave" or/and "Master" Playback sliders. Also, remember that your TX audio cable probably has a circuit with either a voltage divider or, better yet, a pot (potentiometer) which is also adjusts the TX audio level (these components lower the voltage so that it is a better match for the radio). So, when adjusting the TX audio levels, you may also need to adjust the pot. (Obviously a hard-wired voltage divider circuit with 2 resistors is going to be harder to adjust, but if you can't get the Wave/Master sliders to bring the volume into an acceptable range, then you may need to change the resistors.) b. Receive Audio SettingsIf your RX audio cable is connected to your radio's speaker jack, then the receive audio will be controlled by the radio's volume control knob. If you RX audio cable is connected to your radio's MIC jack, then audio control will depend on the pin used at the MIC jack. If it is connected to a pin that offers 'speaker' audio (variable), then the receive audio will be also controlled by the radio's volume control knob. If it is connected to a pin that offers fixed-level audio -- or if it is connected to a similar pin in the radio's special DATA or ACC jack -- then the audio can only be controlled by the Window's volume control program. (Note: if you plan to feed RX audio to the sound card's MIC jack, then you may need a special attenuation circuit to reduce the signal going to that jack. Audio signals from the radio are apt to be much too strong for that jack. See KC2RLM's page with a MIC schematic. The Window Volume Control settings for receive (RX) audio -- audio from the radio -- are a bit more difficult to find in the Volume Control program. They are in an entirely different Volume Control sub-window, the Recording Control window, not in the default Playback window . This is very important. Many people do not realize this Recording window exists. To get to the Recording Window: From the menu of the Playback Volume Control window (graphic above), select Options, then Properties. Click on the Recording radio button to bring up a list of volume controls. Make sure that there's a check mark next to the jack where you plugged in your radio RX audio cable -- either Line In (preferably) or Microphone. Here's what this window looks like on my system: 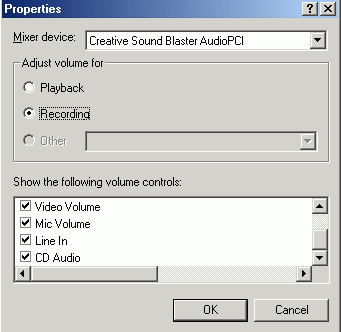
When you're done, click on the OK button. You should then see the Recording Control window. Here is what my receive audio settings look like. Notice the Select check mark under Line In, since I use the Line In jack for Radio RX audio. 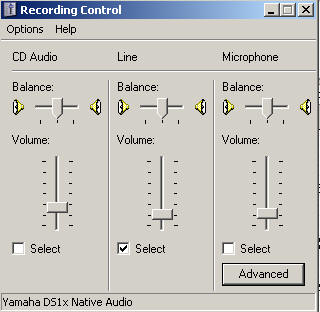
Click the Select box for the jack where you will plug in your radio RX audio cable, either the Line In (preferably) or Microphone. Set the volume sliders about 1/3 up (soft) to start. Adjust them up or down depending on whether or not you can hear signals or if the program indicates the RX audio is too loud or soft (many programs have "oscilloscopes" or "signal meters" that will tell you). Leave the balance slider in the middle. After you've made your choices, click the 'X' in the top right corner of the window to close the window and the Volume Control program. Your settings will be saved automatically. Microphone Boost: warning -- f you opt to use the Microphone jack instead of the Line In jack for RX in, do not use the Microphone Boost option (mine says "Mic 20 dB Enable") if it is offered by your system. I can get to this option by clicking on the Advanced button found under the Microphone slider in the Recording Control window. The "boost" feature typically adds a 20 dB increase in audio volume and is designed to amplify the weak signal from a computer electret microphone. The audio from your radio is typically already too high for input into the MIC jack (that is why you are usually advised to add an attenuation circuit to the RX cable if you intend to use the Mic jack). Using the boost feature will make the problem worse. 2. Using the MIC jack for RX AudioIf you want to, or need to, use the sound card's Microphone jack instead of the LINE IN jack, then you will probably need to add an attenuation circuit on the RX audio line so that you do not overdrive the sound card. The exact attenuation will depend on the maximum output voltage of your radio RX line and the maximum input voltage on the MIC jack of your sound card. (My radio outputs up to 500 mVpp. The Sound Blaster card I use has a maximum rating of of 200 mVpp on the Microphone jack, where the Line In jack has a maximum of 2 Vp-p. Other cards accept a maximum of 100 mV.) You may have success without the attenuation circuit, but the sound card receive settings will probably need to be set very low and will be very sensitive to changes. | Warning: On most sound cards, the Microphone (MIC) jack does not allow stereo input, i.e. a left and right channel. Typically, the ring in the MIC jack is used to provide a +5 bias voltage to power electret microphones. It is not used for stereo (right channel) input. 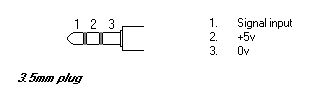
If you do use the MIC jack, it is better to use a stereo plug instead of a mono plug. Just leave the ring (#2above ) unwired. A mono plug can be used, but it will short circuit the ring (+5V) to the sleeve (0V), although the card's circuitry is designed to cope with this -- a resistor severely limits current flow. |
Here's a schematic for a 10:1 attenuation circuit that should work fairly well in many microphone jack setups. The 1:1 audio transformer provides an electrical separation of the computer from the radio and may be especially important on cables used in microphone jacks of laptops. 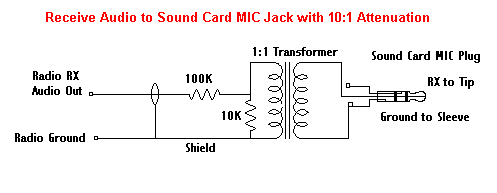
3. Other Multimedia SettingsHere are some additional sound card/multi-media properties that may be help in operating digital modes successfully. Ideally you will not have to worry about these, but they may be the source of unusual problems. - Speaker Type - affects TX audio; generally, Desktop Stereo Speakers should be selected.
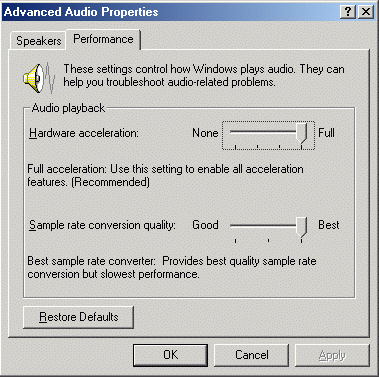
- Hardware Acceleration - can affect both TX and RX audio; generally, the highest rate the computer can handle should be selected, but if a program is having decoding or connection problems, set it to a lower speed.
- Sample Rate Conversion Quality -- affects both TX and RX audio; generally, the highest rate the computer can handle should be selected
These settings are usually made from the same general area in version of windows. Windows XP: Most of the default settings should be as described below but you should check them. Go to Start: Settings: Control Panel and select Sound and Audio Devices. On the Audio tab, press the Advanced button under Sound Playback
On the resulting Speaker tab, select Desktop Stereo Speakers, even if this is a lap top.
Then click on the Performance tab next to the Speakers tab.
Hardware Acceleration should be set to Full, at least at first to see if your computer can handle it. If a program is having decoding or connection problems, you can try setting it to a lower speed.
Sample Rate Conversion Quality must be set to Best.
Then click OK to close the Playback Advanced Properties and return to the Sound and Audio Devices: Audio tab.click on the Apply button (if not gray-ed out) and then the OK button.
Windows 2000: the default hardware acceleration and sample rate conversion sliders are in the middle position. Follow the general instruction for XP above and move these to the right for best performance.
If this icon is not currently in your Windows System Tray (bottom far right of your screen), you may want to add it. It lets you quickly access the Windows volume and audio source settings of the sound card, including some that can not be controlled by your program's SoundCard Volume Settings screen. - In Windows 98 it's , Start: Settings: Control Panel: Multimedia: Audio tab and check
 Show volume control on the taskbar. Show volume control on the taskbar. - In Windows ME it's: Start: Settings: Control Panel: Sounds and Multimedia: Sounds tab; Sound Volume box and check Show volume control on the taskbar.
- In XP, it's Start: Control Panel: Sounds and Audio Devices: Volume tab and check Place volume icon in the taskbar.
- I'm not sure how it's done in Windows 95, but it's probably very similar to Win 98.
You may have conflicts between a program and Windows itself over the use of the sound card. (A typical "crash" message is "An application caused an invalid page fault in module WINMM.DLL"). Or you may find that Windows' sounds are being transmitted along with your digital signals. To avoid this, try turning off Windows' sounds. - In Windows 98 it's: Start: Settings: Control Panel: Sounds: Schemes = No Sounds
- In Windows ME it's: Start: Settings: Control Panel: Sounds: Sound Events: Scheme = No Sounds.
- In XP, it's Start: Control Panel: Sounds and Audio Devices: Sounds tab: Sound Scheme = No Sounds.
- I'm not sure how it's done in Windows 95, but it's probably very similar to Win 98.
For additional information about sound card settings, see the West Mountain Radio site for the ARRL article on the "The Ins and Outs of a Sound Card" < back to the Sound Card Digital Modes page < back to NPARC Home Page |